
It’s not uncommon for a business to receive an unnecessary amount of junk faxes. Not only do they waste paper and toner, but they also waste employee time reading, sorting, and trashing. Wouldn’t it be easier if they didn’t even make it to the fax machine in the first place?
Luckily there’s a simple solution with your Lexmark multifunction device. By following these simple steps from the LexMark Knowledge Base, you can easily add fax numbers to a block list, preventing junk faxes from ever making it to your office.
 How to access “Fax Blocking” or “Banned Fax List”
Method 1: Control panel
This method is preferred if the device is not on the network.
Click on the MENU button.
Click the down-arrow and click on SETTINGS when visible.
Click on the FAX SETTINGS.
Select ANALOG FAX SETUP.
Click on FAX RECEIVE SETTINGS when visible.
Click on the down-arrow until BLOCK NO NAME FAX is visible.
Place a check mark next to this value to activate this feature, or remove the checkmark to disable this feature.
Under Banned Fax List, add or remove any phone numbers necessary.
Click on SUBMIT.
Method 2: Embedded Web Server(EWS) or multifunction Web Page
This method is preferred if the device is on the network and you are not near the machine.
Obtain the printer’s TCP/IP address.
Open your web browser.
In the URL field, type http://multifunction_ IP_ADDRESS, where IP_ADDRESS is the TCP/IP address of the printer.
Click on SETTINGS.
Click on FAX SETTINGS.
Click on ANALOG FAX SETUP.
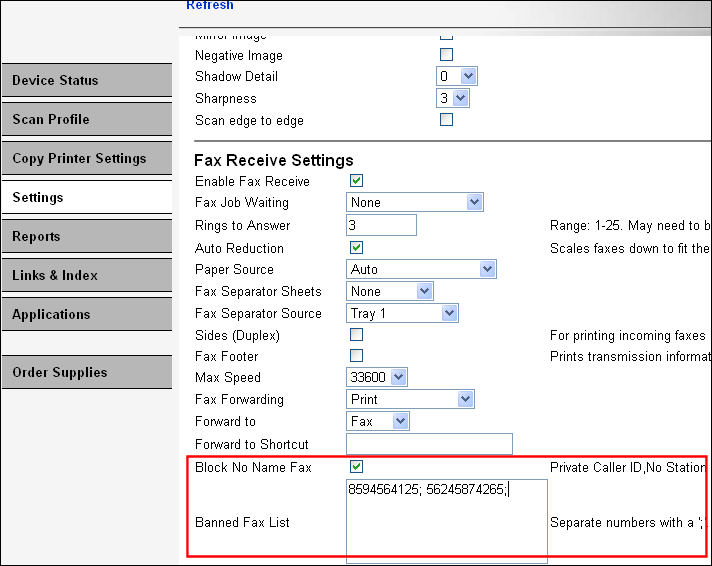
Scroll down to FAX RECEIVE SETTINGS.
Click on the down-arrow until BLOCK NO NAME FAX is visible.
Place a check mark next to this value to activate this feature, or remove the checkmark to disable this feature.
Under Banned Fax List, add or remove any phone numbers necessary.
Click on SUBMIT.
How to access “Fax Blocking” or “Banned Fax List”
Method 1: Control panel
This method is preferred if the device is not on the network.
Click on the MENU button.
Click the down-arrow and click on SETTINGS when visible.
Click on the FAX SETTINGS.
Select ANALOG FAX SETUP.
Click on FAX RECEIVE SETTINGS when visible.
Click on the down-arrow until BLOCK NO NAME FAX is visible.
Place a check mark next to this value to activate this feature, or remove the checkmark to disable this feature.
Under Banned Fax List, add or remove any phone numbers necessary.
Click on SUBMIT.
Method 2: Embedded Web Server(EWS) or multifunction Web Page
This method is preferred if the device is on the network and you are not near the machine.
Obtain the printer’s TCP/IP address.
Open your web browser.
In the URL field, type http://multifunction_ IP_ADDRESS, where IP_ADDRESS is the TCP/IP address of the printer.
Click on SETTINGS.
Click on FAX SETTINGS.
Click on ANALOG FAX SETUP.
Scroll down to FAX RECEIVE SETTINGS.
Click on the down-arrow until BLOCK NO NAME FAX is visible.
Place a check mark next to this value to activate this feature, or remove the checkmark to disable this feature.
Under Banned Fax List, add or remove any phone numbers necessary.
Click on SUBMIT.